I have to admit that I could not have grown my interest in historical clothing as much as I have without the assistance, precautionary advice, and practical knowledge shared on other historical sewing blogs. A type of post I consider to be crucial to building that interest is tutorials. Not only do they show that an idea can, in fact, become a reality, but they show how it can be done. Now, that sounds pretty obvious – that is the point of a tutorial, after all – but I think it shouldn’t be taken for granted. For the occasionally skeptical crafter, such as myself, tutorials can be a huge motivator; tutorials foster a can-do attitude, which is always the first requirement for successfully completing a project. So, in the name of collective craftiness, I decided to put together a tutorial of my own. I hope that it inspires you: either to try this pattern for yourself, or to embark on another artsy adventure. Enjoy!
Ava

First: A Bit of Research
Aprons have long been a staple clothing item for working women, and with good reason. They protect the dress beneath from stains and other damage, and can be washed much more easily. Though this means you will wear out an apron quickly, it increases the longevity of the dress (and when you contemplate sewing a new apron as opposed to creating an entire dress… well, you get the picture). Aprons are also multi functional pieces. They are nearly as efficient as a wheelbarrow in transporting firewood, are just as useful as a bucket for gathering produce, and are synonymous with a hot pad when dealing with cook stoves, pots, pans, etc.
In the late 1700s, “pinner aprons” entered common fashion. These aprons incorporated a bib above the waistband, which covered a portion of the bodice. A possible reason for this change is the fact that dresses were either one piece or were made as purposefully matching two piece ensembles. The lack of interchangeable top and bottom options could have been a motivator to protect not only the skirt, but the bodice as well. With exception to a brief pause during the Regency period, the pinner apron maintained its popularity until the late 1800s.
The top corners of the bib were affixed with pins. Prior to the invention of the safety pin in 1849, fibula pins were used (more information on fibula pins can be found here). The primary difference between the two is that the safety pin has a curve on the end that accepts the pin, thus preventing the wearer from being poked by the pin’s sharp end. This is what makes it “safer” than the other.
By the 1860s, the pinner apron had taken on a relatively distinctive appearance. The bib was gathered at the waistband, creating an inverted trapezoid shape. The bottom of the apron covered a larger surface area, reaching at least across the front half of the waist. Aprons could be made in colors or patterns – darker colors would have been more popular for working women, as they didn’t show stains as easily. The aprons for nurses, however, were largely white in an effort to promote sanitation.
Below are some era-appropriate images that I used as primary sources for my apron.


Without further ado… The Pattern!
The Basic Elements
There are 5 cuts of fabric needed for this apron: 1 for the bottom half of the apron, 1 for the waistband, 1 for the bib, and 2 for the pocket (optional). All the pieces are essentially rectangles of varying dimensions, which will be based on your personal measurements. This should ensure an apron that fits you perfectly. Each letter has a corresponding measurement explanation, which accounts for seam allowances, hems, etc. These are displayed in the diagram below.
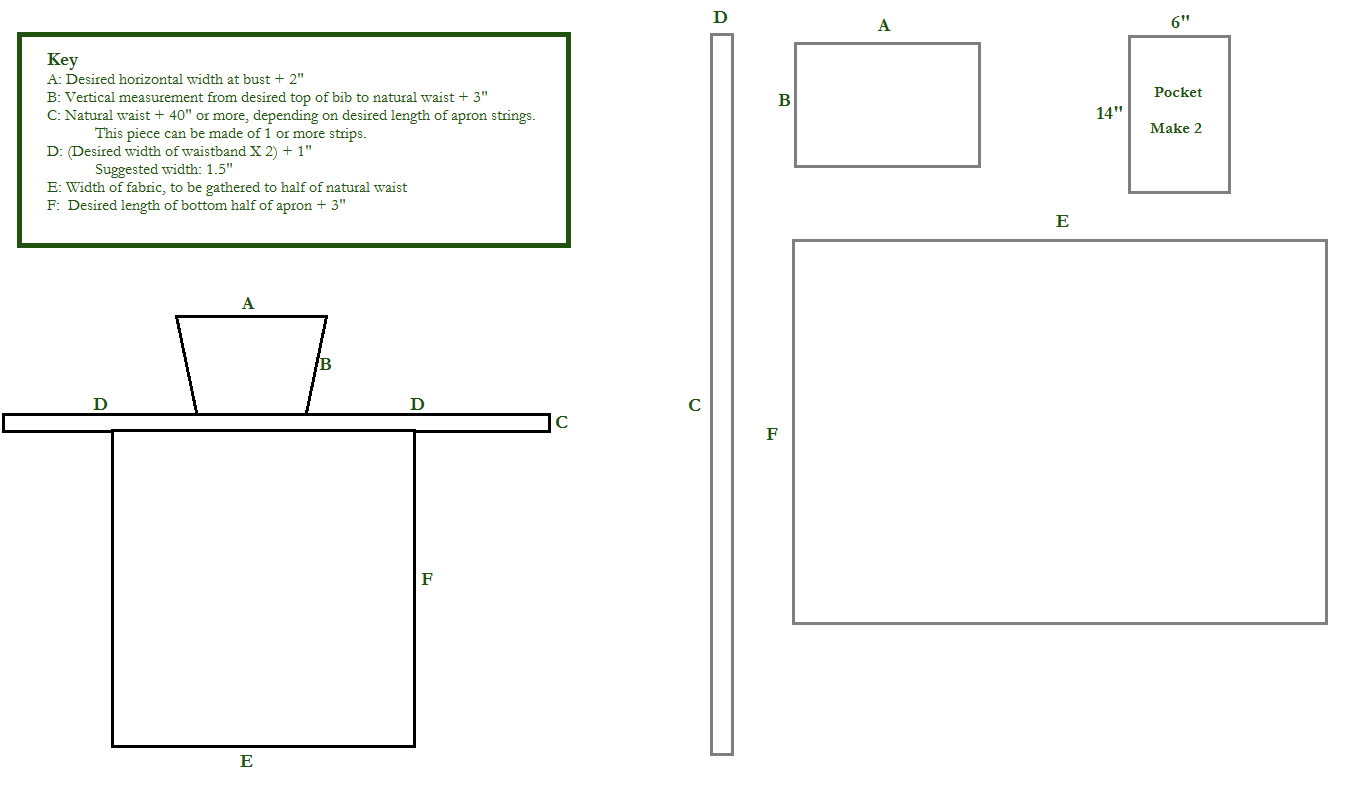
Note: If you are making the waist band out of two or more joined pieces (which you will likely need to do, if you have a shorter cut of fabric), you should add 1″ to the total length for each additional strip you use. This adjusts for seam allowances.
Interior Pocket (if desired)

Step 1 
Step 2 
Step 3 
Step 4
- Place the two pocket pieces right sides together and sew along both 14″ sides and one of the 6″ sides, using a 1/2″ seam allowance.
- Clip the corners, and turn the pocket right side out. Press if desired.
- Fold the finished 6″ edge up lengthwise, until it is approximately 1″ away from the unfinished edge.
- Sew the two formerly 14″ sides, securing the sides of the pocket. You’ll likely want to do some additional back stitching at the top and bottom of these seams, to strengthen the pocket and prevent further damage. Do not sew the side with the unfinished edge, as this is the opening of the pocket. The raw edge will be inserted into the waistband later on in the assembly.
Pressing and Prepping Apron Seams

Step 1
- Press 1/2″ folds on both sides of measurement B, both sides of measurement F, one side of measurement A, and one side of measurement E.
- (If you’re using multiple pieces for the waistband, join them now with a 1/2″ seam allowance and press seam flat.) When waistband is at the desired length, fold it in half lengthwise and iron a crease. Open the fold. Fold each of the long sides in 1/2″ and iron. This creates finished edges for both sides of the waistband.
Sewing Seams and Gathering
- Fold the measurement A with the pressed edge over 2″. Sew along the bottom of this fold (the current location of the pressed edge).
- Fold both sides with measurement B over 1/2″, and sew these folds in place.

Step 1 
Step 1, cont. 
Step 2
3. Similarly, fold the measurement E with the pressed edge over 2″. Sew this fold.
4. Fold sides with measurement F over 1/2″ and sew these folds into place.
5. Add gathers to the non-pressed edges with measurements A and E, using a contrasting color thread. Secure the gathers by tying a knot at both ends of the thread. Though you can gather to your desired dimensions, suggested widths are as follows: Measurement E to approximately 3/4 of your natural waist, Measurement A to approximately 1/5 of your natural waist. Reference photos for accuracy.

Step 5 
Step 5, cont.
Piecing It All Together
This is where it gets a little tricky. The waistband is the connecting element for all the pieces, and consequently all the pieces will be “clamped” inside it. Though I will attempt to explain the positioning of the pieces, the picture below will probably be the best point of reference.


- Center the bib and the bottom half of the apron, putting wrong sides together. Place pocket on your preferred side, with the side with the unfinished edge facing the wrong side of the bottom half of the apron.
2. Center the waistband above it all, open the lengthwise crease down the middle of the waistband, and place the other three pieces (bottom half of the apron, bib, and pocket) inside the crease, and fold the waistband back. The waistband is now “clamping” the other pieces together. Adding pins along the distance where all the pieces converge will help keep the gathers in place.
Final Seam
- “Open” the end of the waistband and fold the end in 1/2″. Refold the waistband and sew the end shut. At the corner, turn the fabric and sew along the long edge. The needle should be piercing through both sides of the waistband; when you reach the other pieces, it should travel through one side of the waistband, then the apron/bib/pocket, and through the other side of the waistband. Finish out the other waistband end in a manner similar to the way you began.

Open 
Fold in 
Refold 
Turn the fabric 
Finish the other end similarly
Clean up any loose threads, and you’re ready to go!

Pinned to the bodice

Inside pocket 
Apron strings
Wow! That was quite a whirlwind. What did you think? Will you try it yourself? How should I improve for any future tutorials?
I hope you enjoyed this post. Keep your eyes open for more historical clothing posts – including a comparison of some recurring historic styles! That’s all for now,
Ava
Sources
Dietz, Paula. “THE MANY GUISES OF THE HUMBLE APRON.” The New York Times, The New York Times, 3 Feb. 1982, http://www.nytimes.com/1982/02/03/garden/the-many-guises-of-the-humble-apron.html.
“A Visual History of the Safety Pin.” Museum of Every Day Life, museumofeverydaylife.org/exhibitions-collections/current-exhibitions/a-visual-history-of-the-safety-pin.
“A Quick History of Aprons.” Port Library, http://Www.portlibrary.org, http://www.portlibrary.org/uploads/8/1/4/2/8142513/a_quick_history_of_aprons_3.pdf.
Bellis, Mary. “Sewing Is a Lot Safer Thanks to This Inventor.” ThoughtCo, ThoughtCo, 3 July 2019, http://www.thoughtco.com/walter-hunt-profile-1991916.


